Understanding fastai's Applications: Digit classifier using fastai framework.
Book notes: Deep Learning for Coders


Chapter 4 : Under the Hood : Training a Digit Classifier.
First, let's try to build a classifier that could classify any image as a 3 or 7.
#get our sample MNIST data
path = untar_data(URLs.MNIST_SAMPLE)
Path.BASE_PATH = path
#get the threes and sevens data
threes = (path/'train'/'3').ls().sorted()
sevens = (path/'train'/'7').ls().sorted()
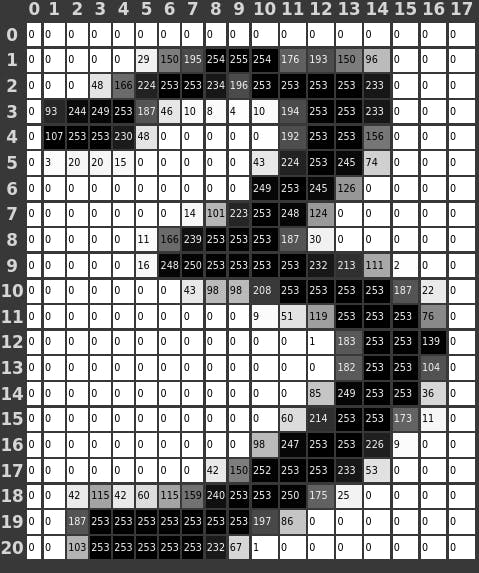
#let's try and visualize each pixel intensity
im3_path = threes[1]
im3 = Image.open(im3_path)
im3_t = tensor(im3)
#we make sure to get pixels where the numbers' pixels are concentrated
df = pd.DataFrame(im3_t[4:25, 4:22])
df.style.set_properties(**{'font-size':'6pt'}).background_gradient('Greys')
#Let's group the each category into one list of tensors
threes_tensors = [tensor(Image.open(o)) for o in threes]
sevens_tensors = [tensor(Image.open(o)) for o in sevens]
#then stack them into a torch tensor
#we want to kinda normalize the pixels intensity by divinding by 255
stacked_sevens = torch.stack(sevens_tensors).float()/255
stacked_threes = torch.stack(threes_tensors).float()/255
Now let's use the baseline approach, the first thing that comes in mind is to calculate the mean of each category which will represent the perfect image representing each category, then all we have to do is calculate the distance from each one of the "perfect seven" or "perfect three".
#get the mean along the firt axis
mean3 = stacked_threes.mean(0)
mean7 = stacked_sevens.mean(0)
#the prediction label is the category with the minimum distance
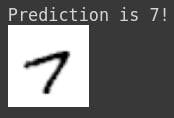
target = stacked_sevens[12]
#notice thtat by default torch.cdist is using the L2 norm(RMSE) here
dist3 = torch.sum(torch.cdist(target, mean3))
dist7 = torch.sum(torch.cdist(target, mean7))
show_image(target)
if (dist3 <= dist7):print("Prediction is 3!")
else: print("Prediction is 7!")
NumPy Arrays and PyTorch Tensors
Numpy is the most predominant library for scientific and numeric programming, it provides us with similar API to the one provided by PyTorch but it doesn't support GPU nor calculating gradient, which makes it not ideal for Deep Learning tasks.
Computing Metrics using Broadcasting
#for the sake of broadcasting we've modified our implmentation
def mnist_distance(a,b): return (a-b).abs().mean((-1,-2))
def is_3_v2(x): return (mnist_distance(x,mean3) < mnist_distance(x,mean7)).float()
(1 - is_3_v2(valid_7_tens).float().mean()) *100
Notice that we're already achieving good result, but don't forget that we're trying to predict only on two classes.
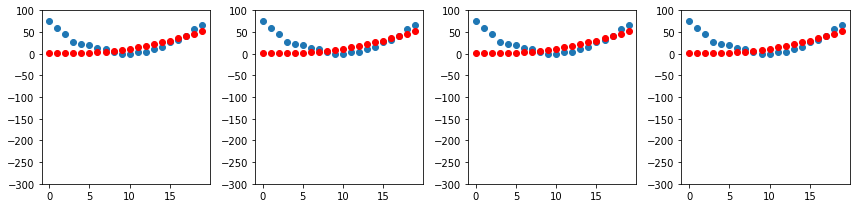
end-to-end SGD example
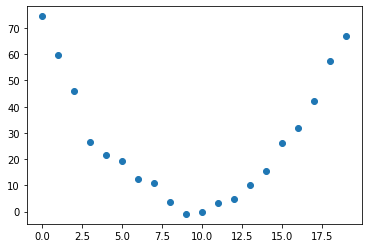
We will go through an example where we would like to calculate speed of a roller coaster as it went down downhill.
#get the time
time = torch.arange(0,20).float()
#generqte speed with some random noise applied
speed = torch.randn(20)*3 + 0.75*(time-9.5)**2 +1
plt.scatter(time, speed)
#define our quadratic functiom
def f(t, params):
a,b,c = params
return a*(t**2) + (b*t) +c
#define our loss function : mean squared error
def mse(preds, targets):return ((preds-targets)**2).mean()
#initialize our params randomly
#we should mention that its expected to calculate gradient later
params = torch.randn(3).requires_grad_()
#define a function to show prediction plot
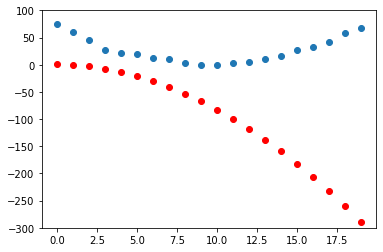
preds = f(time, params)
def show_preds(preds, ax=None):
if ax is None: ax=plt.subplots()[1]
ax.scatter(time,speed)
ax.scatter(time, to_np(preds), color='red')
ax.set_ylim(-300, 100)
show_preds(preds)
#step -> upgrading params
def apply_step(params, prn=True):
  preds = f(time, params)
  loss = mse(preds, speed)
  loss.backward()
  params.data -= params.grad.data * lr
  params.grad = None
  if prn: print(loss.item())
  return preds

#we could see how we begin to fit the speed function
_, axs = plt.subplots(1,4, figsize=(12,3))
for ax in axs: show_preds(apply_step(params, False), ax)
plt.tight_layout()
The MNIST Loss Function
#here we could use a sigmoid function to map our prediction
#into 0-1 range
def mnist_loss(predictions, targets):
  predictions = predictions.sigmoid()
  return torch.where(targets==1, 1-predictions, predictions).mean()
SGD with mini-batches
DataLoaders is a class that could take any Python collection and turn it into an iterator over many batches.
coll = range(15)
dl = DataLoader(coll, batch_size=5, shuffle=True)
list(dl)
#using fastai it's pretty simple
#notice tha nn.Linear init the params for us
linear_model = nn.Linear(28*28,1)
opt = SGD(linear_model.parameters(), lr)
train_model(linear_model, 20)
#or we could use Datalaoders
dls = DataLoaders(dl, valid_dl)
learn = Learner(dls, nn.Linear(28*28, 1), opt_func=SGD,
              loss_func=mnist_loss, metrics=batch_accuracy)
learn.fit(10, lr=lr)
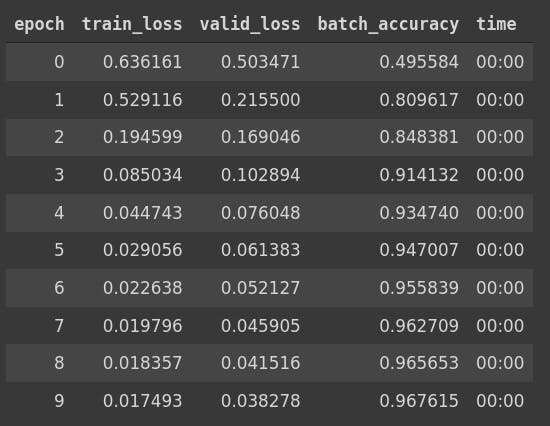
Adding non-linearity
you'll expect ~100% accuracy
#as simple as this
simple_net = nn.Sequential(
    nn.Linear(28*28, 30),
    nn.ReLU(),
    nn.Linear(30, 1)
)
learn = Learner(dls, simple_net, opt_func=SGD,
 loss_func=mnist_loss, metrics=batch_accuracy)
learn.fit(40, 0.1)